Custom CSS for WordPress.
Customize your website.
WP Quick Tools is a WordPress utility plugin with modules you can activate individually. Its Custom CSS (Pages) module lets you customize WordPress with CSS rules applied across your website or to one or more selected pages, without editing theme files.
You can name each rule, enable or disable it, and keep a copy of the configuration by exporting it as JSON. It brings your custom WordPress CSS together in one panel: you need to understand CSS selectors and check the result with your theme and page builder.
This guide describes the release candidate currently being tested. The module changes frontend presentation: it does not execute PHP or JavaScript and does not replace a website backup. It is not a custom plugin generator: it styles elements already present on your pages.
A WordPress plugin to organize your CSS
Choose where each rule loads
Use Entire site for a shared style, or Selected pages only for a targeted change. In the latter case, search for a page by title and add it to the selection. The CSS affects elements matching the selectors you write.
Organize separate changes
Create multiple rules and give each a recognizable title. You can collapse a rule to make the panel easier to read, disable it without removing it, or delete it when it is no longer needed.
Write responsive styles too
The CSS field accepts standard rules and media queries. There are no automatic desktop and mobile switches: you define the selectors and conditions. The WordPress code editor is used when available.
Keep a copy of the configuration
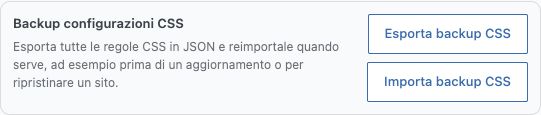
Export the rules to a JSON file before making changes. Importing restores the CSS configuration in the file and replaces the module configuration: it does not simply add new rules or restore the rest of your website.
How to customize WordPress with targeted changes
- Apply a consistent style to a class used on several pages, with a rule that loads across the website.
- Change an element’s spacing or borders on a single landing page by restricting the rule to that page.
- Adapt an element to smaller screens with a media query, checking the result on the relevant devices.
Your first rule, step by step
1. Open the module and preserve the initial state
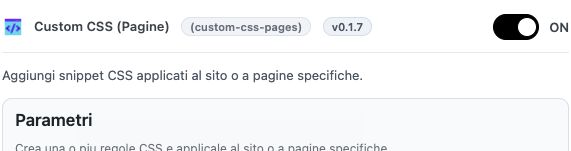
In WP Quick Tools, open Custom CSS (Pages). If rules already exist, export a backup before changing any fields. Activate the module if needed: its ON/OFF switch saves immediately, while rule settings require Save Tools configuration.
2. Create an identifiable rule
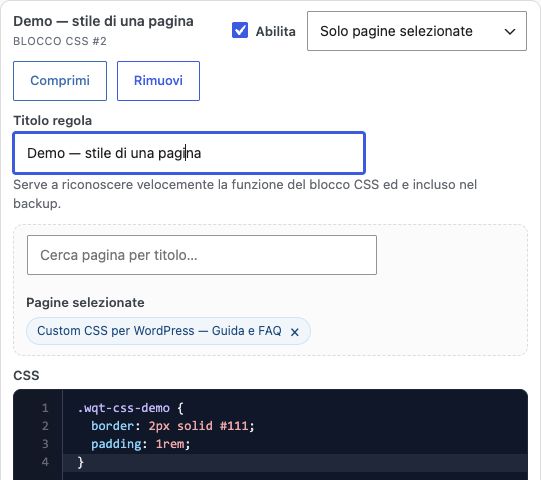
Click Add CSS rule, enter a title such as Demo box, and leave Enable selected. For your first test, choose Selected pages only and a test page, avoiding changes across the entire website.
3. Select the relevant page
Search for the page by title and select it in the results. Make sure it appears under Selected pages: typing its title is not enough. You can add more pages or remove a selection with the button beside its name.
4. Add a targeted example
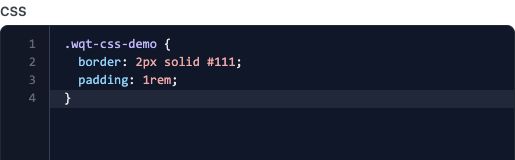
Assign the class wqt-css-demo to an element on your test page using the option in your editor. Enter the class name without a dot in the class field. In the CSS, use the selector .wqt-css-demo instead. The example below changes only elements with that class and adds no content or scripts.
5. Save and check the frontend
Click Save Tools configuration and open the page on the frontend. Check desktop and mobile, and also check a page that was not selected. If you cannot see the change, check the class, page selection, Enable status and page cache before adding more invasive rules.
6. Keep or undo your test
To suspend the effect, clear Enable for the rule and save. To keep your work, export the CSS backup. If you import a file, remember that the restore is applied directly: first keep a copy of the configuration you are replacing.
.wqt-css-demo {
  border: 1px solid #111;
  padding: 1.5rem;
}

@media (max-width: 600px) {
  .wqt-css-demo {
    padding: 1rem;
  }
}
Visual guide
Four real screenshots of the module, with numbered steps. The demonstration rule was prepared without saving it: the website’s CSS remained unchanged. Use the arrows or dots to browse the images.
Frequently asked questions
Where is the CSS applied?
Each rule has its own scope. Entire site loads the rule on frontend pages that run the standard WordPress wp_head hook. Selected pages only loads it on the specified WordPress pages. This setting determines where CSS loads, but does not automatically change selectors: to target an element, use an appropriate class or selector.
Can I select posts, archives or products?
Specific selection in this version covers WordPress pages, not posts, archives or other content types. Search can show published, private and draft pages without making them public. Entire site mode can load CSS on other frontend views too, but there is no dedicated selector to assign a rule to an individual post or product.
Do I need to save after changing a rule?
Yes. The title, scope, selected pages, code and Enable checkbox are settings that must be saved with Save Tools configuration. The module’s ON/OFF toggle saves immediately instead. This distinction helps avoid mistaking a change still sitting in the browser form for an already active setting.
How can I avoid changing unintended elements?
Start with a test page and a dedicated class, such as wqt-css-demo. Select that page and use .wqt-css-demo in your rules, rather than very broad selectors such as div or h2. The module does not automatically add a scoping prefix to your code. Check other elements sharing that class before extending the rule to the entire website.
Can I create different styles for mobile and desktop?
Yes, by writing standard media queries in the CSS field. The module does not generate breakpoints or responsive variants automatically. Choose conditions suited to your layout and check at least one desktop and one mobile width. The result also depends on theme and builder rules: a correct media query alone does not guarantee that overlaps or overflow will be avoided.
Does it work with Elementor, Gutenberg and other builders?
The module adds frontend CSS through standard WordPress APIs and does not require a particular builder. To style an element, however, you need to understand the classes and structure generated by your editor. A preview inside an editor or iframe may differ from the published page. Always check the actual frontend; this guide does not imply certified compatibility with every theme, builder or version.
Why does a saved rule not change the page’s appearance?
Check that both the module and rule are active, that the CSS is not empty, that the correct page is selected and that the selector actually matches an element. Then check syntax errors and precedence over theme styles. A page cache can retain the previous HTML and therefore the old CSS: refresh only the relevant cache with the tools already available and reload the page. The module does not promise to clear every cache automatically.
Which rule wins when several styles affect the same element?
The normal CSS cascade applies: origin, importance, specificity and declaration order matter, as do any cascade layers. Module rules are output in their stored order, but this does not mean they always override theme or builder styles. Before adding !important, identify the conflicting declaration and use a precise selector. Avoid global fixes that make maintenance harder.
What does the CSS backup contain?
The JSON file stores the module’s rules, including titles, status, scope, CSS and selected page IDs. It is not a full WordPress backup. An export may include the values currently entered in the panel, even if they have not been saved: if you want a copy of the earlier state, export before editing fields. Keep the file in a private location because it may contain URLs and configuration details.
Does importing a backup add or replace rules?
Importing replaces the module’s CSS configuration and applies it immediately, reloading the panel after success. Compatible JSON files up to 2 MiB are accepted. Export the current configuration first and check the backup contents. Page IDs are not automatically converted between websites: a file from another installation requires checking the page assignments before relying on the result.
Are pages translated with WPML selected automatically?
No: specific assignments use the page IDs listed in the rule and do not automatically map them to translations. If the style should also load on translated pages, check and select the relevant versions in the available language context. A global rule can serve several languages if they share classes. Do not translate CSS class names without coordinating the corresponding markup.
Can I add JavaScript or PHP? Who can edit the rules?
This module is for CSS: do not enter script tags, PHP code or HTML markup in the field. Configuration requires WQT management permissions and the WordPress unfiltered_html capability, which may be restricted even for some multisite administrators. CSS is not risk-free: it can hide content, alter controls or load external resources through URLs. Use only code you understand and have checked; the module is not a comprehensive CSS security validator.
How can I pause a change without losing it?
To stop one rule, clear Enable and save the settings. To pause the entire module, use its OFF toggle: settings are retained. Remove deletes the rule from the editing form, and that deletion must be saved. Before removing rules or importing a configuration, export a JSON copy: a module backup and a full website recovery are different operations.